Tincanium

Hugh McLaughlin, September, 2011

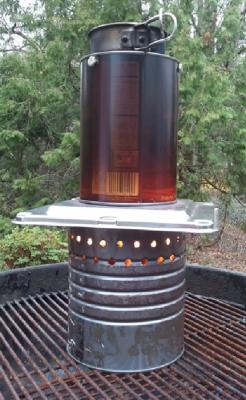
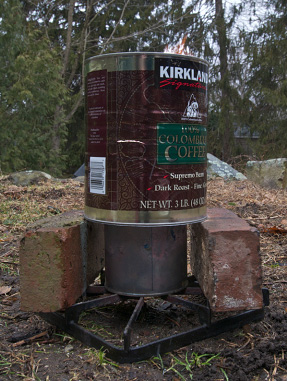
I may have solved a design issue with the combustion of the wood gas in a TLUD. I call it the "Toucan Flair", which is a play on words (flair > flare) because the distinguishing feature is an axial tube providing "axial air" to the secondary combustion zone. This axial air source is coupled to the primary air source, which is controlled by a small fan pressurizing a plenum to support the two burners provided for the entire stove.

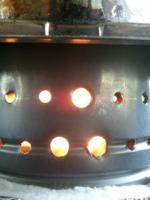
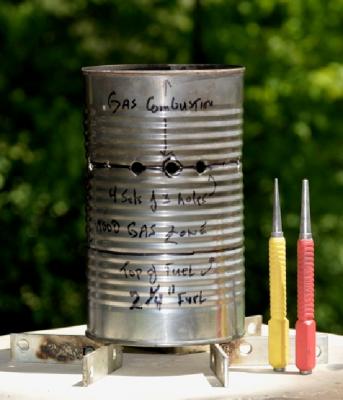
Additional "scroll air" enters in the riser above the ignition level for the wood gas, providing a concentrated region of combustion. Depending on how much wood gas is generated, as controlled by the degree of fan assist, the flames can be driven to the bottom of the pot, but the unit can also simmer as required (see photos).

This geometry basically turns the concentrator disk inside out - and make for a preheated expanding jet of wood gas, that is consumed by the excess scroll air. Axial and scroll are burner terms for air injected inside the fuel and provided on the perimeter of the fuel. The terms may well be engineering slang. However, the effect is significant, based on my comparison of the side by side configurations (Toucan Flair versus traditional concentrator disk TLUD).

Jock Gill, May, 2011

Jock has updated his iCan instructions on Flickr:
http://www.flickr.com/photos/jockgill/sets/72157626640937954/

from Jock's email:

The triplets of triplets in the secondary air supply is a significant improvement.

The 18-12-6 iCan now has much greater total time with a very well behaved flame and an air fuel mixture that is lean to good for most of the run.
There are still several minutes of a too rich mixture that does emit some soot.

Run time on 350 grams was 27:45, most of the smoke was gone within 2 minutes, just two floaters, and the biochar had a good clean nose. This is about as good as I have gotten so far.

Jock Gill, April 2011
Peacham, Vermont, usa


My little iCan made from a 3 lbs Costco coffee can boiled 1.75 liters of water in 42 minutes this afternoon. Ambient temp was 47 [8.33C]. This was done in 5 batches averaging 350 ml each. A very clean burn. Some soot at the start of each batch when the water was cold. Just a soon as the water in the cup warmed up a bit, the soot stopped.

Of course I also made some biochar as well.

Fuel was a good quality wood pellet. Cost of fuel: about 17 cents assuming pellets at $230 per ton. They can be bought for a good deal less, but I am using a higher number to be safe.

Cost per liter boiled: ~ 7.4 cents, allowing 4 cents as the value of the biochar captured at the rate of 17.5% of the dry weight of the fuel.

Jock Gill, May 2010

With one can: I can make a stove I can cook a meal I can make biochar I can be carbon negative I can start to change the world

This iCan is made from a 7" tall pineapple juice canThis iCan is made from a 7" tall pineapple juice can

I took a 7" tall pineapple juice can, removed the contents, and then marked it thusly:

1. A line around the can 1/3 from the bottom --- this is the top of the fuel load

2. A line around the can 1/3 from the top -- this is the line for the secondary air holes

The middle section is for the wood gas buffer to insure pyrolysis, not combustion.

Next

Primary air supply for a 7" tall pineapple juice canPrimary air supply for a 7" tall pineapple juice can

Marked the bottom of the can off into 8 equal sections. I then used a nail set to make 8 equally spaced holes about half way between the outside of the can and its center. I made a 9th hole in the center. Not too big -- about 1/2 way down the small nail set shaft.

Then I used the line1/3 down from the top to locate the secondary air holes.
I made 8 equally spaced holes with the small nail punch and then used the the biggest punch to enlarge the holes to the full width of its shaft.

At this point I removed the top of the can completely. I left it on for the best structural integrity while I was punching holes.

Done. The All-in-One TLUD is complete. Very simple. Just 17 holes in the right places in one can.

More pictures, are also available at: http://www.flickr.com/photos/jockgill/sets/72157624142002304/
and click here for more story details: http://www.bioenergylists.org/node/2827

Jock Gill, Pellet Futures / Biochar NE Medford, MA March 4, 2010

Jock has been adding to this design, for the most recent updates see: http://www.flickr.com/photos/jockgill/

From Willie to Richard: A Family of Tincanium Stoves
Paul Anderson,Hugh McLaughlin

A Power Point Presentation presented at the 2010 ETHOS Conference. It is a bit "tongue in cheek."

Enjoy!

Paul
--Paul S Anderson, Ph.D. -- aka Dr. TLUD ("Dr. Tee-lud")
Biomass Energy Consultant with BEF, & Partner in Chip Energy.
Specialist in micro-gasification.
Office & Res: 309-452-7072

Martin Boll, January, 2010

Take a normal 870ml (fruit-) can, cut with a sharp-edged knife parallel cuts in the bottom with about 5mm distance.

1.-Bend with a screw-driver and pliers the metal-ribbons to get a grate.
This alone works well, but looses some fuel/charcoal.

2.- Form a “plissee”-metal-sheet (pleated) out of the side of a (10cm
diameter) can.

Each zig-zag-side about 1cm. The angles 60°. Put the can with slits ( like
1.-) onto the plisse-grate/support, so that the slits cross the plies in 90°.

-The plissee-lines are directed in wind-direction.

-The ashes on the pleated-metal-sheet can be cleaned with a thin stick or wire, while burning; but caution, that the tin-can-stove does not tumble.

-Another advantage of the plissee is, that the grat/bottom is heat-isolating and protected by the ashes. The charcoal falling through the upper gate is burning on the ashes on the plissee.

How to Make a Tin Can Rocket Stove
Larry Winiarski, Aprovecho Research Center, September 2008

Dick Boyt has built a stove out of ten cans of various sizes. The drawing below shows how it fits together and operates.

Pages

Subscribe to Tincanium